Recommended setup sequence
This guide documents a secure OpenClaw deployment on AWS EC2, with exact commands and implementation order, and it reflects a production-ready, security-first setup pattern. OpenClaw should be installed in an isolated sandbox environment with no access to active working files, which is why a dedicated VPS or separate hardware is strongly recommended. After installation, keep permissions tight, avoid granting broad access to critical systems or sensitive data, and maintain reliable backups before expanding access.
Anyone can try the same setup for free on AWS Free Tier (account and region limits apply): https://aws.amazon.com/free/.
This implementation uses a small Ubuntu VPS and follows a clear sequence: secure baseline first, platform stability second, then OpenClaw install and channel onboarding.
The result is a production-ready, security-first deployment pattern that teams can use with confidence.
This order reduces lockout risk and avoids avoidable runtime instability during setup.
- 1) Create a non-root admin user
- 2) Set up a dedicated SSH key for this server and bot
- 3) Harden SSH config
- 4) Enable firewall
- 5) Enable Fail2Ban
- 6) Enable automatic security updates
- 7) Add swap
- 8) Install Node with NVM
- 9) Install and onboard OpenClaw
- 10) Connect Telegram (easiest channel)
- 11) Use terminal tools for troubleshooting (openclaw tui, tmux, zsh)
Step 1: First login, create a non-root admin user, then lock root
First login from your local machine using the AWS key pair you downloaded during instance setup:
chmod 400 ~/.ssh/awskey.pem
ssh -i ~/.ssh/awskey.pem ubuntu@ec2-XX-XXX-XXX-XXX.us-east-2.compute.amazonaws.com
adduser <youruser>
usermod -aG sudo <youruser>
passwd -l root
Step 2: Set up a dedicated SSH key for this server
Choose a clear server name and bot name, then use both in the key filename for strong operational clarity.
Use one dedicated key pair per server/bot deployment to simplify access control and key rotation.
ssh-keygen -t ed25519 -a 64 -f ~/.ssh/<server-name>_<bot-name>_key
ssh-copy-id -i ~/.ssh/<server-name>_<bot-name>_key.pub <youruser>@<your-vps-ip>
Add this to ~/.ssh/config:
Host <server-name>
  HostName ec2-XX-XXX-XXX-XXX.us-east-2.compute.amazonaws.com
  User <youruser>
  IdentityFile ~/.ssh/<server-name>_<bot-name>_key
IdentitiesOnly yes- Test with: ssh <server-name>
Step 3: Harden SSH (sshd_config)
Edit /etc/ssh/sshd_config (or a drop-in in /etc/ssh/sshd_config.d/) with these settings:
- PermitRootLogin no
- PasswordAuthentication no
- KbdInteractiveAuthentication no
- PubkeyAuthentication yes
- AllowUsers <youruser>
- X11Forwarding no
- AllowAgentForwarding no
- AllowTcpForwarding no
- PermitTunnel no
- ClientAliveInterval 300
- ClientAliveCountMax 2
- MaxAuthTries 3
- LoginGraceTime 30
Validate and reload: sshd -t && systemctl reload ssh- Keep your current SSH session open while testing a second login
Step 4: Enable firewall (only open what you use)
sudo apt update && sudo apt install -y ufw
sudo ufw default deny incoming
sudo ufw default allow outgoing
sudo ufw allow OpenSSH- If hosting web: sudo ufw allow 80,443/tcp
sudo ufw enable
sudo ufw status verbose
Step 5: Install and enable Fail2Ban
sudo apt install -y fail2ban
sudo systemctl enable --now fail2ban
sudo fail2ban-client status
sudo fail2ban-client status sshd
Step 6: Turn on automatic security updates
sudo apt install -y unattended-upgrades
sudo dpkg-reconfigure unattended-upgrades
Still patch regularly: sudo apt update && sudo apt upgrade -y
Step 7: Add swap (important on small VPS plans)
The /etc/fstab line means: /swapfile is the path, none means no mount directory, swap is the type, sw is default options, and 0 0 disables dump/fsck checks.
swapon --show
free -h (before swap)
sudo fallocate -l 2G /swapfile
sudo chmod 600 /swapfile
sudo mkswap /swapfile
sudo swapon /swapfile
echo '/swapfile none swap sw 0 0' | sudo tee -a /etc/fstab
sudo swapon --show
free -h (after swap)
Step 8: Install Node with NVM
curl -fsSL https://raw.githubusercontent.com/nvm-sh/nvm/v0.39.7/install.sh | bash
source ~/.bashrc
nvm install node
node -v
Step 9: Install OpenClaw and onboard daemon
npm install -g openclaw@latest
openclaw --help
openclaw onboard --install-daemon- If memory is tight during startup: export NODE_OPTIONS=--max-old-space-size=4096
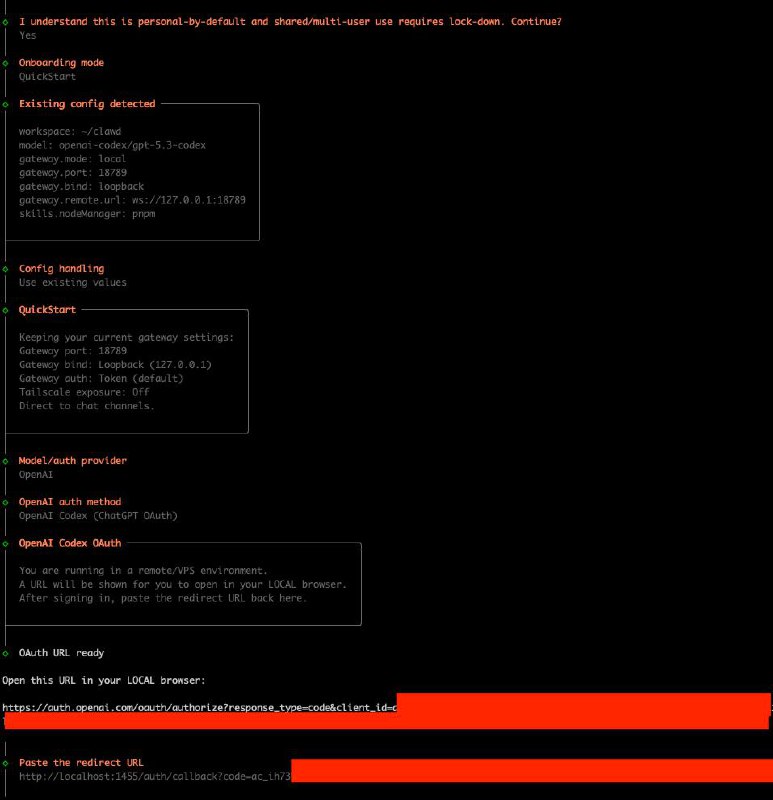
Optional: OpenAI Codex OAuth (works with a free OpenAI account)
During onboarding choose Provider OpenAI and auth method OpenAI Codex (ChatGPT OAuth): https://openai.com/codex/.
On a remote VPS, OpenClaw gives you a URL. Open it in your local browser, sign in, then paste the redirected URL back into the VPS terminal.
If callback uses localhost (for example localhost:1455/...), that is expected.
Recommended first channel: Telegram
For most teams, Telegram is the fastest initial channel to deploy across desktop and mobile. Setup guide: https://docs.openclaw.ai/channels/telegram
Troubleshooting workflow
Use the terminal UI first for direct, server-side diagnostics.
If further analysis is needed, share the exact error output with your preferred AI assistant and include system context.
openclaw tuiOperational improvements after install
Two practical upgrades improve day-to-day server operations: tmux and zsh with oh-my-zsh.
- Install tmux: sudo apt install -y tmux
- Start tmux: tmux new -s openclaw
- Detach tmux: Ctrl+b then d
- Reattach tmux: tmux attach -t openclaw
- Install zsh + oh-my-zsh: sudo apt install -y zsh git curl
sh -c "$(curl -fsSL https://raw.githubusercontent.com/ohmyzsh/ohmyzsh/master/tools/install.sh)"- Useful zsh plugins: git, sudo, z, history-substring-search
Quick minimum-secure checklist
- Non-root sudo user
- Dedicated key-based SSH login
- PermitRootLogin no
- Password SSH auth disabled
- Firewall default deny + explicit allowed ports
- Fail2Ban
- Unattended security updates
Conclusion
OpenClaw can be deployed quickly, but production reliability depends on execution discipline.
Establish security controls first, validate system stability second, then complete installation and onboarding.
PS: This write-up is based on a real command history from a live VPS install, cleaned into a repeatable sequence.